
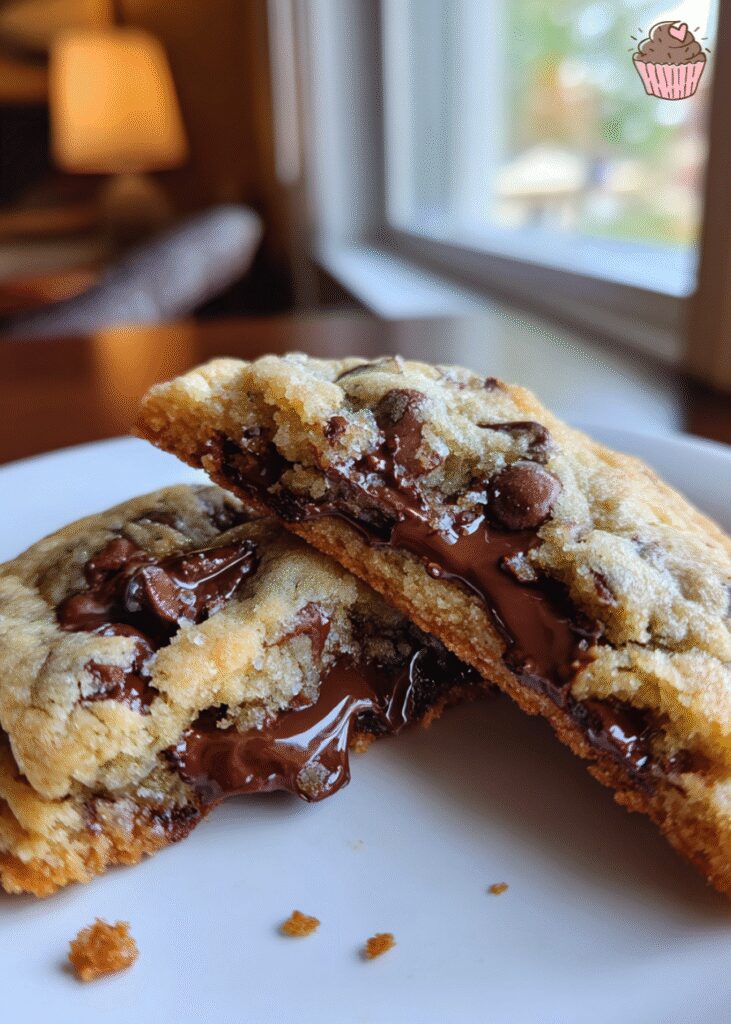
The Ultimate Chewy, Gooey Brown Butter Chocolate Chip Cookies
Oh, my friends, prepare yourselves for a cookie experience that will redefine your expectations! These Brown Butter Chocolate Chip Cookies aren’t just a treat; they’re a revelation. The secret? That glorious, nutty, deeply caramelized brown butter that transforms a classic into something truly extraordinary. Get ready for perfectly chewy edges, a soft, gooey center, and an irresistible depth of flavor that will have everyone asking for your secret recipe.
Why You Will Absolutely Adore These Brown Butter Chocolate Chip Cookies
- Unforgettable Flavor: Browning the butter adds a complex, toasted, nutty depth that’s simply unmatched by traditional cookies.
- Perfect Texture Every Time: Expect chewy edges, a soft, melt-in-your-mouth center, and just the right amount of gooey chocolate in every bite.
- Elevated Classic: We’re taking the beloved chocolate chip cookie and giving it a gourmet upgrade that’s still incredibly approachable.
- Crowd-Pleasing Perfection: Whether it’s for a party, a quiet evening, or just because, these cookies are guaranteed to impress everyone who tries them.
- Therapeutic Baking: The process of browning butter and watching these beauties bake is a joy in itself, a little escape into culinary bliss.
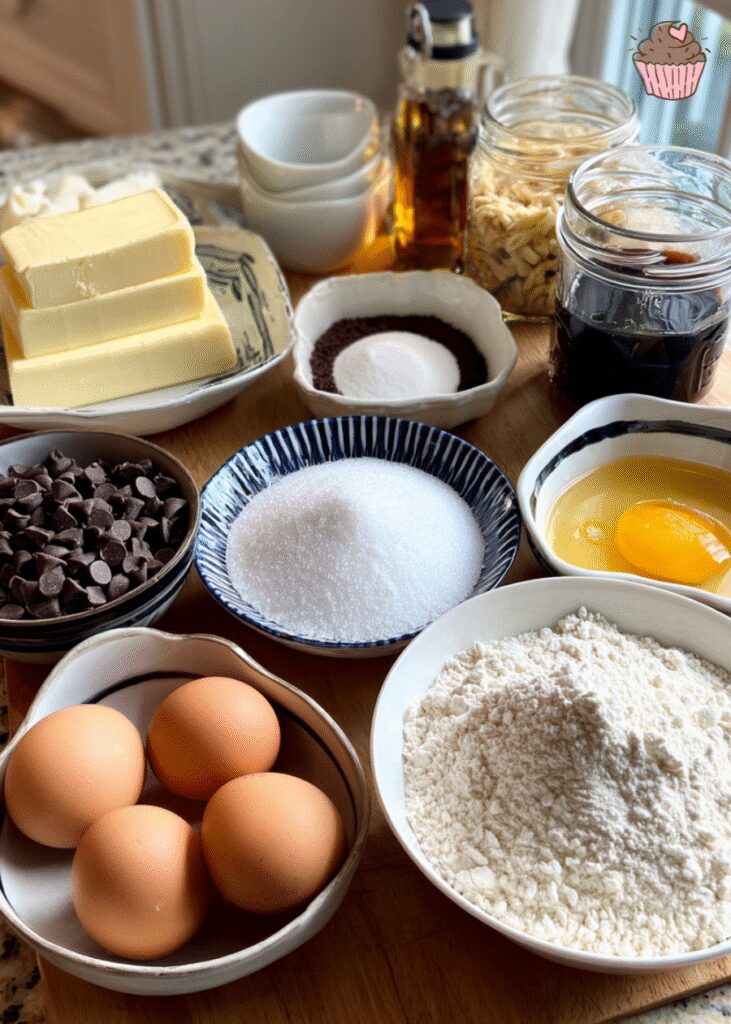
Gather Your Ingredients for Brown Butter Chocolate Chip Cookies
For the Brown Butter Magic
- 1 cup (226g) unsalted butter
The Sweet & Essential Base
- 1 cup (200g) granulated sugar
- 3/4 cup (150g) packed light brown sugar
- 2 large eggs, at room temperature
- 2 teaspoons pure vanilla extract
The Dry Foundation
- 2 1/4 cups (270g) all-purpose flour
- 1 teaspoon baking soda
- 1 teaspoon salt (fine sea salt works beautifully here)
The Chocolate Stars
- 1 1/2 cups (255g) chocolate chips (I love a mix of semi-sweet and dark chocolate chips for complexity!)
Baking Bliss: Step-by-Step for Your Brown Butter Chocolate Chip Cookies
Step 1: The Art of Browning Butter
- In a light-colored saucepan, melt the unsalted butter over medium heat. Keep a close eye on it!
- The butter will foam, then subside. Continue to stir or swirl occasionally.
- Once you start seeing golden brown flecks at the bottom of the pan and a wonderfully nutty aroma fills your kitchen, immediately remove it from the heat.
- Pour the browned butter (including all those glorious brown bits!) into a heatproof bowl. Let it cool for about 10-15 minutes, or until it’s still warm but no longer sizzling.
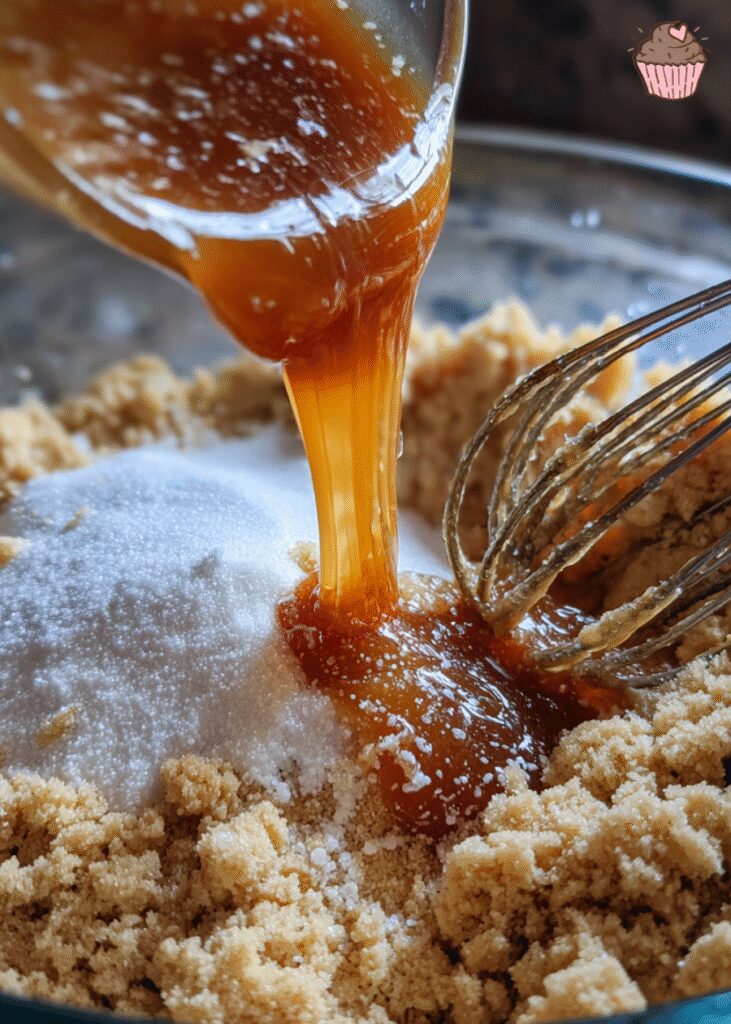
Step 2: Creaming the Goodness
- In a large mixing bowl, combine the slightly cooled brown butter with both the granulated sugar and light brown sugar. Beat with an electric mixer on medium speed for 2-3 minutes until light and fluffy. This aeration is key for a tender cookie!
- Add the eggs one at a time, beating well after each addition. Scrape down the sides of the bowl to ensure everything is fully incorporated.
- Stir in the pure vanilla extract. Oh, that aroma!
Step 3: The Dry Ingredients
- In a separate medium bowl, whisk together the all-purpose flour, baking soda, and salt. Whisking ensures everything is evenly distributed and prevents pockets of leavening agent.
Step 4: Combining Wet and Dry
- Gradually add the dry ingredient mixture to the wet ingredients, mixing on low speed until just combined. Be careful not to overmix! Overmixing develops gluten, which can lead to tough cookies.
- Gently fold in your chosen chocolate chips until they are evenly distributed throughout the dough. I like to save a few for pressing into the tops of the cookie dough balls for that bakery-style look.
Step 5: The Crucial Chill
- Cover the bowl with plastic wrap and refrigerate the cookie dough for at least 2 hours, or ideally, overnight. This chilling period is non-negotiable for the best flavor and texture!
- If chilling overnight, you might need to let the dough sit at room temperature for 10-15 minutes before scooping, as it will be quite firm.
Step 6: Bake Away!
- Preheat your oven to 375°F (190°C). Line baking sheets with parchment paper or silicone baking mats.
- Scoop the chilled dough using a 1.5-2 tablespoon cookie scoop, rolling them into smooth balls.
- Place the dough balls about 2 inches apart on the prepared baking sheets.
- Bake for 10-12 minutes, or until the edges are golden brown and the centers are still slightly soft. They might look a little underdone, but they’ll continue to cook as they cool, leading to that perfect gooey center!
Step 7: Cool and Enjoy
- Remove the baking sheets from the oven and let the cookies cool on the sheet for 5 minutes. This helps them set up and prevents them from breaking.
- Transfer the cookies to a wire rack to cool completely. Or, if you’re like me, enjoy one (or two!) warm, right off the sheet. Pure bliss!
Substitutes & Variations: Personalize Your Brown Butter Chocolate Chip Cookies
Chocolate Choices
- Chocolate Chunks: Instead of chips, chop up your favorite chocolate bar (milk, dark, or a mix) for luscious puddles of melted chocolate.
- White Chocolate & Macadamia: Swap out some of the semi-sweet chocolate for white chocolate chips and add 1/2 cup of chopped macadamia nuts for a different flavor profile.
- Triple Chocolate: Combine semi-sweet, milk, and dark chocolate chips for an ultimate chocolate lover’s dream.
Nutty Additions
- Toasted Nuts: Fold in 1/2 to 1 cup of toasted chopped pecans or walnuts along with the chocolate chips for an extra layer of crunch and nutty flavor.
- Peanut Butter Chips: For a delightful twist, replace half of the chocolate chips with peanut butter chips.
Flavor Enhancers
- Flaky Sea Salt: A sprinkle of flaky sea salt on top of the warm cookies right as they come out of the oven enhances all the flavors beautifully.
- Espresso Powder: A teaspoon of instant espresso powder added to the dry ingredients can deepen the chocolate flavor without making the cookies taste like coffee.
- Bourbon/Whiskey: For an adult twist, a tablespoon of bourbon or whiskey can be added with the vanilla extract, complementing the brown butter notes.
Flour Alternatives
- Whole Wheat Pastry Flour: For a slightly healthier, yet still delicious, option, you can substitute up to half of the all-purpose flour with whole wheat pastry flour. It adds a subtle nuttiness that pairs well with the brown butter.
Serving Suggestions: Enjoying Your Brown Butter Chocolate Chip Cookies
- Classic Milk Pairing: There’s nothing quite like a warm brown butter chocolate chip cookie with a tall, cold glass of milk. It’s a timeless combination for a reason!
- With Ice Cream: Serve warm cookies with a scoop of your favorite vanilla bean or coffee ice cream for an indulgent dessert. A drizzle of caramel sauce wouldn’t hurt either!
- Coffee or Tea Companion: These cookies are the perfect accompaniment to your morning coffee or an afternoon cup of tea, adding a touch of sweetness to your daily ritual.
- Cookie Ice Cream Sandwiches: For an extra special treat, let the cookies cool completely, then sandwich a scoop of ice cream between two for homemade ice cream sandwiches.
- Just as They Are: Honestly, these cookies are so good on their own, fresh from the oven, that you don’t need anything else to make them shine!
Storage Tips for Your Brown Butter Chocolate Chip Cookies
- At Room Temperature: Store cooled cookies in an airtight container at room temperature for up to 3-4 days. They’ll retain their chewiness and flavor beautifully.
- Freezing Baked Cookies: Once completely cooled, place cookies in a single layer on a baking sheet and freeze until solid. Transfer to a freezer-safe bag or container and store for up to 3 months. Thaw at room temperature or warm gently in the microwave.
- Freezing Dough: Scoop dough balls and place them on a parchment-lined baking sheet. Freeze until solid, then transfer to a freezer-safe bag. When ready to bake, place frozen dough balls on a baking sheet and bake as directed, adding 2-3 minutes to the baking time. This is my favorite trick for fresh-baked cookies anytime!
My Golden Tip: Don’t Skip the Dough Chilling!
Seriously, my friends, this is the single most important step for achieving those perfect, bakery-style Brown Butter Chocolate Chip Cookies. Chilling the dough for at least 2 hours (or even better, overnight!) does two magical things: first, it allows the brown butter’s nutty flavor to fully develop and meld with the other ingredients, creating a more complex and rich taste. Second, it solidifies the butter, which prevents the cookies from spreading too much in the oven, ensuring you get those wonderfully thick, chewy cookies with soft centers. Trust me on this one; patience truly is a virtue in cookie making!
A Sweet Farewell (For Now!)
There you have it, my dear friends! A recipe that’s more than just cookies; it’s an experience. These Brown Butter Chocolate Chip Cookies are truly a testament to how a small tweak can elevate a classic to new heights. The nutty aroma, the perfectly balanced sweetness, the irresistible chewiness – every bite is a little moment of joy. I promise you, once you try these, you’ll find yourself reaching for this recipe again and again. So, tie on your apron, get that butter browning, and prepare to fill your home with the most incredible scent and, of course, the most delicious cookies. Happy baking, and don’t forget to share your cookie triumphs with me!

The Ultimate Chewy, Gooey Brown Butter Chocolate Chip Cookies
- Prep Time: 20 minutes
- Cook Time: 12 minutes
- Total Time: 2 hours 30 minutes
- Yield: 24 cookies 1x
- Category: Dessert
- Method: Baking
- Cuisine: American
- Diet: Vegetarian
Description
Discover the ultimate recipe for chewy, gooey Brown Butter Chocolate Chip Cookies. This enhanced classic features a deep, nutty flavor from browned butter and a perfect texture that will impress everyone.
Ingredients
- 1 cup (226g) unsalted butter
- 1 cup (200g) granulated sugar
- 3/4 cup (150g) packed light brown sugar
- 2 large eggs, at room temperature
- 2 teaspoons pure vanilla extract
- 2 1/4 cups (270g) all-purpose flour
- 1 teaspoon baking soda
- 1 teaspoon salt (fine sea salt works beautifully here)
- 1 1/2 cups (255g) chocolate chips (a mix of semi-sweet and dark chocolate chips)
Instructions
- In a light-colored saucepan, melt the unsalted butter over medium heat.
- Continue to stir or swirl occasionally as the butter foams, then subsides.
- Once golden brown flecks appear at the bottom and a nutty aroma develops, immediately remove from heat.
- Pour the browned butter into a heatproof bowl and let it cool for 10-15 minutes.
- In a large mixing bowl, combine the cooled brown butter with granulated sugar and light brown sugar. Beat with an electric mixer on medium speed for 2-3 minutes until light and fluffy.
- Add the eggs one at a time, beating well after each addition. Scrape down the sides of the bowl.
- Stir in the pure vanilla extract.
- In a separate medium bowl, whisk together the all-purpose flour, baking soda, and salt.
- Gradually add the dry ingredient mixture to the wet ingredients, mixing on low speed until just combined. Do not overmix.
- Gently fold in the chocolate chips until evenly distributed.
- Cover the bowl with plastic wrap and refrigerate the dough for at least 2 hours, or ideally, overnight.
- Preheat your oven to 375°F (190°C). Line baking sheets with parchment paper or silicone baking mats.
- Scoop the chilled dough using a 1.5-2 tablespoon cookie scoop, rolling them into smooth balls.
- Place the dough balls about 2 inches apart on the prepared baking sheets.
- Bake for 10-12 minutes, or until the edges are golden brown and the centers are still slightly soft.
- Remove from the oven and let cool on the baking sheet for 5 minutes.
- Transfer the cookies to a wire rack to cool completely before serving.
Notes
- For the best flavor and texture, do not skip the chilling step for the dough.
- A mix of semi-sweet and dark chocolate chips provides a wonderful depth of flavor.
- If desired, sprinkle a pinch of flaky sea salt on top of the warm cookies for an extra flavor boost.
- Ensure butter is cooled slightly before mixing with sugar to avoid scrambling the eggs.
Nutrition
- Serving Size: 1 cookie
- Calories: 220 kcal
- Sugar: 20g
- Sodium: 120mg
- Fat: 12g
- Saturated Fat: 7g
- Unsaturated Fat: 5g
- Trans Fat: 0g
- Carbohydrates: 28g
- Fiber: 1g
- Protein: 2g
- Cholesterol: 30mg
Keywords: brown butter chocolate chip cookies, best chocolate chip cookies, chewy cookies, gooey cookies, homemade cookies, dessert recipe, baking, easy cookies
Frequently Asked Questions About Brown Butter Chocolate Chip Cookies
Browning the butter is the secret sauce! It toasts the milk solids in the butter, creating a rich, nutty, and slightly caramel-like flavor that adds incredible depth and complexity to the cookies, elevating them far beyond a standard chocolate chip cookie.
While unsalted butter is generally preferred for baking to control the salt content, you can use salted butter. If you do, I recommend reducing the added salt in the recipe by half a teaspoon to avoid overly salty cookies. Always taste your dough (before adding eggs if you’re concerned about raw egg) or adjust as needed.
Absolutely! Chilling the dough is crucial for two main reasons. First, it allows the flavors, especially the brown butter, to deepen and meld, resulting in a more complex taste. Second, it solidifies the butter, which prevents the cookies from spreading too much in the oven, giving you those wonderfully thick, chewy cookies with perfectly soft centers. Don’t skip it!
When stored in an airtight container at room temperature, these cookies will stay wonderfully fresh and delicious for 3-4 days. They tend to soften slightly over time, which can be lovely, but they’re definitely at their peak in the first day or two.
Yes, absolutely! These cookies are a fantastic base for customization. Feel free to fold in about 1/2 to 1 cup of chopped pecans, walnuts, or even a different type of chocolate, like white chocolate chips or toffee bits, along with your chocolate chips. Just be mindful not to overcrowd the dough with too many additions.
Several factors can cause cookies to spread too much. The most common culprits are not chilling the dough enough (or at all), using butter that’s too warm, or an oven that isn’t at the correct temperature. Ensure your butter is slightly cooled after browning, thoroughly chill your dough, and consider using an oven thermometer to verify your oven’s accuracy.
Recipe by Nora, Choco Kitchen Blog


