
Classic Iced Chocolate Recipe
There’s something about a perfectly crafted iced chocolate that takes me right back to my childhood summers. I remember standing at the counter of our local café, mesmerized as the barista poured rich, velvety chocolate over ice, creating swirls of creamy perfection that looked almost too beautiful to drink. Almost.
Now, after years of perfecting my own recipe, I can confidently say that making the ultimate iced chocolate at home isn’t just possible – it’s surprisingly simple. What makes this drink so special isn’t complicated techniques or exotic ingredients. It’s about understanding how temperature, texture, and quality ingredients work together to create something that’s both refreshing and indulgent.
This isn’t your average chocolate milk poured over ice cubes. We’re talking about a rich, creamy beverage with the perfect balance of chocolate intensity and cooling refreshment. It’s the kind of drink that makes you close your eyes on the first sip and smile involuntarily. Trust me, once you master this classic iced chocolate recipe, you’ll never settle for store-bought versions again.
Essential Ingredients for Perfect Iced Chocolate
The beauty of this recipe lies in its simplicity, but that means every single ingredient needs to be top-quality. There’s nowhere for inferior products to hide when you’re working with just a handful of components.
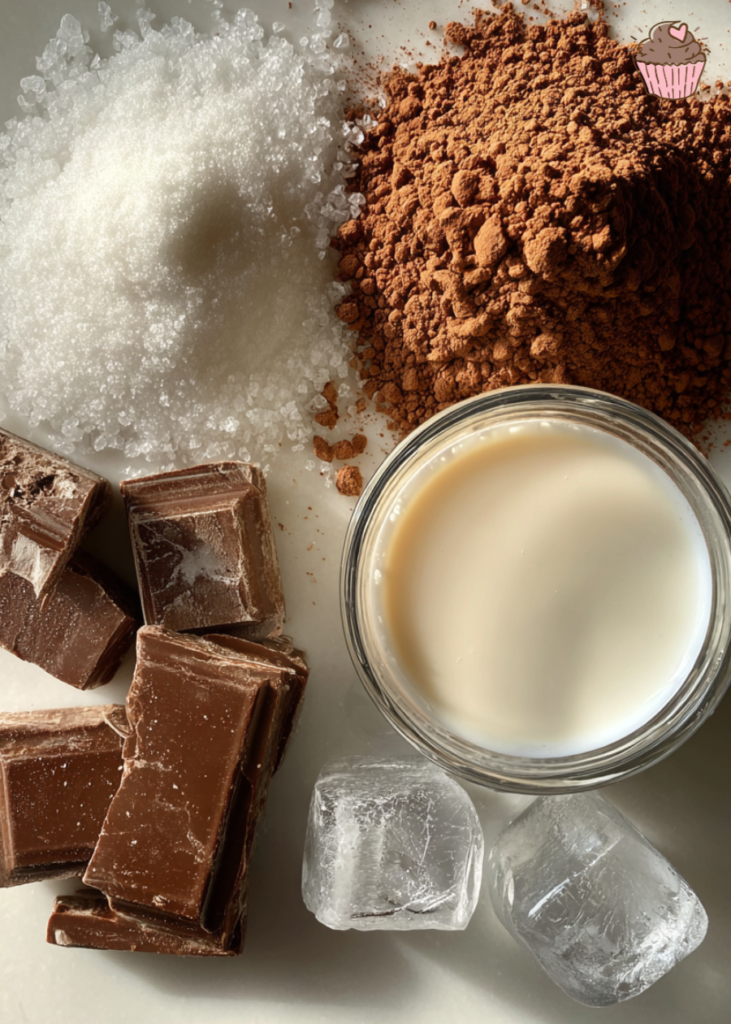
Whole milk forms the creamy foundation of our iced chocolate. I’ve experimented with different fat contents, and honestly, whole milk is non-negotiable here. The fat creates that rich, satisfying mouthfeel and helps carry the chocolate flavors beautifully. Low-fat milk just doesn’t have the same luxurious quality – it tastes thin and leaves you wanting more substance.
Heavy cream is our secret weapon for extra richness. Just a splash transforms the entire drink from good to absolutely incredible. It adds this silky texture that makes each sip feel like a special treat. Some days, when I want to be extra indulgent, I’ll increase the cream ratio slightly, and the results are always worth it.
High-quality cocoa powder is where you can really taste the difference. I use Dutch-processed cocoa because it has this deep, mellow chocolate flavor without any bitterness. Regular cocoa powder works too, but the Dutch-processed variety gives you that smooth, sophisticated taste that makes this drink feel café-worthy.
Dark chocolate adds complexity and depth that cocoa powder alone can’t achieve. I prefer using chocolate with about 60-70% cacao – it’s rich enough to provide intensity but not so bitter that it overwhelms the drink. The combination of cocoa powder and melted chocolate creates layers of chocolate flavor that unfold as you drink.
Sugar might seem straightforward, but I’ve found that using superfine sugar or even making a simple syrup works best. Regular granulated sugar can leave a slightly gritty texture, especially in cold drinks. The goal is sweetness that enhances the chocolate without masking its natural complexity.
Vanilla extract is the unsung hero of this recipe. Just a few drops add warmth and depth, rounding out the chocolate flavors beautifully. I always use pure vanilla extract – the artificial stuff just doesn’t have the same subtle complexity.
A pinch of salt might sound odd in a sweet drink, but trust me on this one. Salt enhances all the other flavors and makes the chocolate taste more chocolatey. It’s one of those small additions that makes a huge difference.
Step-by-Step Method: Creating Chocolate Perfection
Making perfect iced chocolate is all about building flavors gradually and paying attention to temperature and texture.
Step 1: Prepare Your Chocolate Base
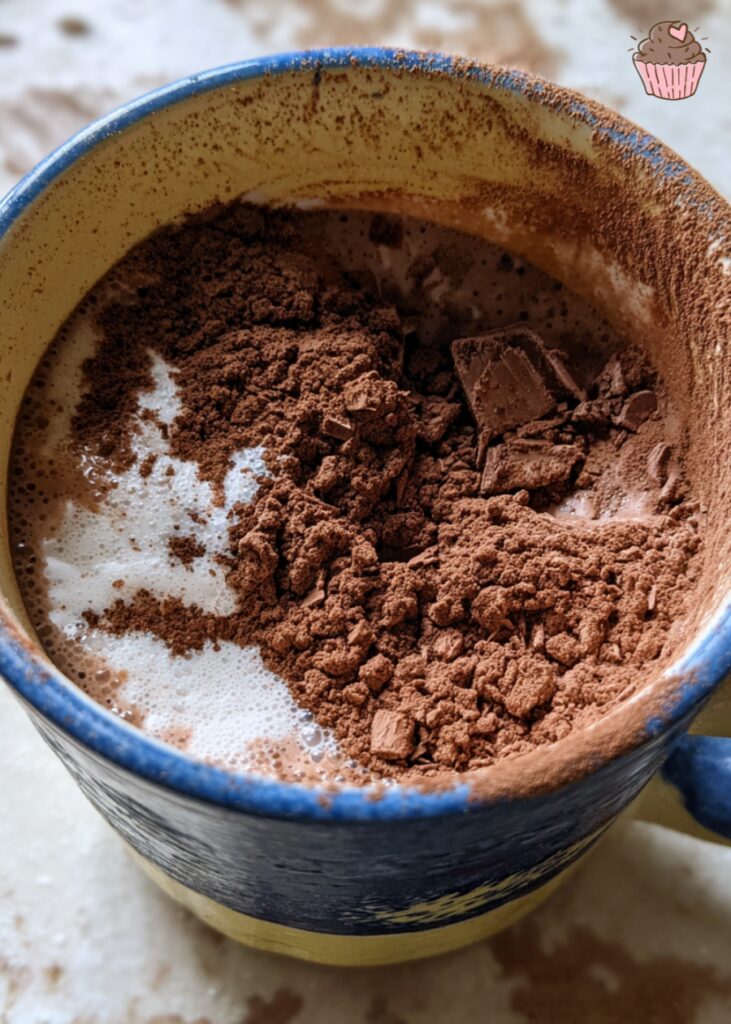
Start by chopping your dark chocolate finely – this helps it melt evenly and prevents any chunks in your final drink. In a small bowl, whisk together the cocoa powder with a tiny bit of the milk to create a smooth paste. This prevents the cocoa from clumping when you add it to the hot milk later.
Step 2: Heat the Milk Mixture
In your saucepan, gently heat the milk and cream over medium-low heat. You want it warm enough to melt the chocolate but not so hot that it scalds. Watch for tiny bubbles around the edges – that’s your signal that it’s ready. This usually takes about 3-4 minutes.
Step 3: Incorporate the Chocolate
Remove the pan from heat and immediately whisk in your chopped chocolate until it’s completely melted and smooth. Then add your cocoa paste, whisking constantly to prevent any lumps from forming. The mixture should be glossy and completely uniform in color.
Step 4: Sweeten and Season
Add your sugar, vanilla extract, and that crucial pinch of salt. Whisk everything together until the sugar is completely dissolved. Taste and adjust – you might want a bit more sweetness or vanilla depending on your preferences.
Step 5: Cool Down
This is where patience pays off. Let your chocolate mixture cool to room temperature, stirring occasionally to prevent a skin from forming on top. Once it’s cooled, transfer it to the refrigerator for at least 2 hours. You want it completely chilled before serving.
Step 6: Serve with Style
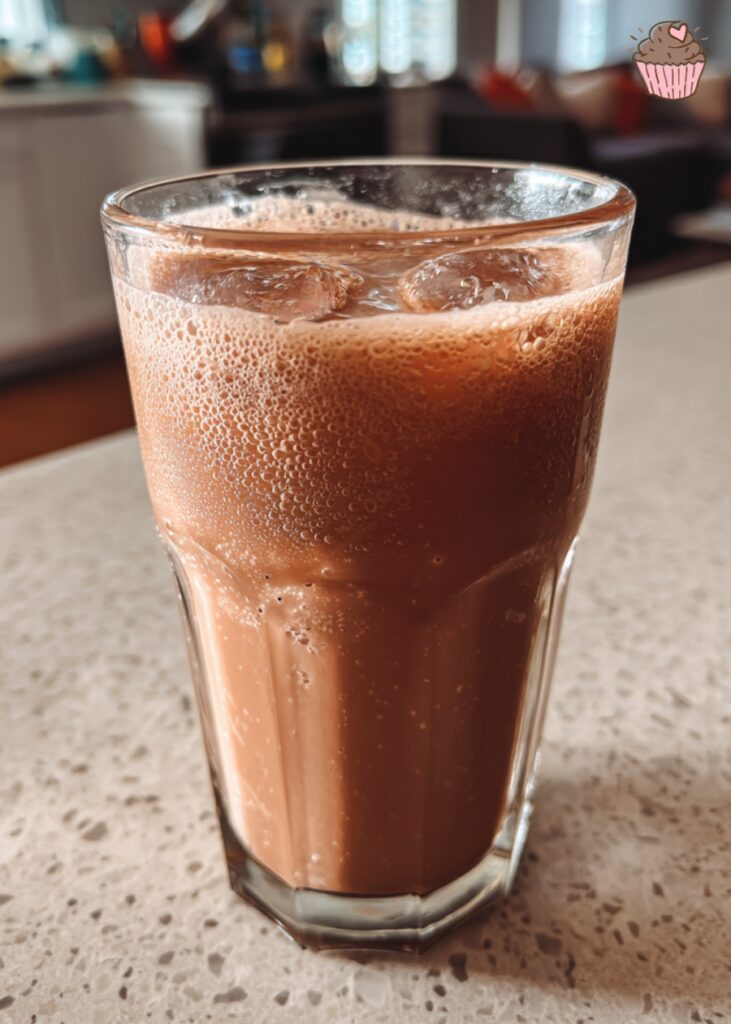
Fill tall glasses with ice cubes – I prefer larger cubes because they melt slower and don’t water down the drink as quickly. Pour your chilled chocolate mixture over the ice, leaving room for toppings if desired.
Perfecting the Temperature and Texture
Temperature control is absolutely crucial for exceptional iced chocolate. The base needs to be thoroughly chilled – not just cool, but properly cold. When chocolate mixture hits ice while still warm, you get immediate dilution and a drink that tastes weak and disappointing.
I learned this lesson the hard way during my early experiments. I was impatient and tried to serve the chocolate mixture when it was only slightly cool. The result was a lukewarm, watery mess that bore no resemblance to the rich, refreshing drink I was aiming for.
The texture should be smooth and creamy, coating the back of a spoon lightly. If it seems too thick, you can thin it with a bit more cold milk. If it’s too thin, a splash of cream will add body and richness.
One trick I’ve discovered is to stir the chilled mixture before serving. Sometimes the ingredients separate slightly during chilling, and a quick stir brings everything back together beautifully.
Creative Variations and Flavor Twists
Once you’ve mastered the classic version, the possibilities for customization are endless, and this is where you can really make the recipe your own.
Mint chocolate is one of my favorite variations. Add a few drops of peppermint extract to the base mixture – start with less than you think you need because peppermint can quickly overwhelm. Fresh mint leaves as garnish complete the experience beautifully.
Spiced chocolate brings warmth and complexity. A pinch of cinnamon, a tiny amount of cayenne pepper, or even a hint of cardamom can transform the entire drink. I especially love the cinnamon version during transitional seasons when you want something cooling but with cozy undertones.
Coffee chocolate creates a mocha-style drink that’s perfect for afternoon pick-me-ups. Add a shot of strong, cooled espresso or even instant coffee dissolved in a small amount of warm milk. The coffee enhances the chocolate rather than competing with it.
Orange chocolate is surprisingly sophisticated. A small amount of orange zest added during the heating process infuses the milk with citrus oils that complement chocolate beautifully. Strain out the zest before chilling.
For extra indulgence, try adding a tablespoon of Nutella or peanut butter to the warm mixture. Both melt beautifully and add incredible richness and complexity.
Toppings and Garnishes That Make It Special
The right toppings can transform your iced chocolate from a simple drink into a dessert experience that rivals anything you’d find in a high-end café.
Whipped cream is the classic choice, and I always make my own. Heavy cream whipped with a touch of vanilla and sugar tastes infinitely better than store-bought versions. I like to pipe it in generous swirls that invite you to dive in with a spoon.
Chocolate shavings add visual appeal and extra chocolate intensity. Use a vegetable peeler on a bar of good chocolate, or grate it finely for a different texture. Dark chocolate shavings provide contrast, while milk chocolate adds sweetness.
Crushed cookies bring delightful crunch. Chocolate wafer cookies, graham crackers, or even amaretti biscuits all work beautifully. I sometimes crush them coarsely and sprinkle them over whipped cream for that satisfying textural contrast.
Caramel or chocolate sauce drizzled over the top creates beautiful patterns and adds sweetness. I prefer making my own caramel, but high-quality store-bought versions work well too.
Fresh berries might seem unconventional, but strawberries and raspberries pair surprisingly well with chocolate. They add freshness and a pop of color that makes the drink feel more sophisticated.
Storage and Make-Ahead Tips
This chocolate base keeps beautifully in the refrigerator for up to one week, making it perfect for batch preparation. I often make a double batch on Sunday and have incredible iced chocolate ready whenever cravings strike.
Store the mixture in a sealed container in the refrigerator. The ingredients may separate slightly over time, but a quick stir brings everything back together perfectly. Sometimes I’ll give it a few pulses with an immersion blender if it seems to need extra mixing.
You can even freeze the mixture in ice cube trays for an interesting twist. Chocolate ice cubes in regular milk create a drink that gets richer as the cubes melt – it’s like built-in flavor enhancement.
If you’re entertaining, you can set up a beautiful iced chocolate bar with the base mixture, various toppings, and different glasses. Guests love customizing their own drinks, and it creates a fun, interactive element to any gathering.
Print
Classic Iced Chocolate Recipe
- Prep Time: 10 mins
- Cook Time: 5 mins
- Total Time: 2 hrs 15 mins (including chilling)
- Yield: 2 servings 1x
- Category: Beverage
- Method: Stovetop + Chilling
- Cuisine: International
- Diet: Vegetarian
Description
A rich and creamy iced chocolate drink made with whole milk, heavy cream, cocoa powder, dark chocolate, and a touch of vanilla, perfectly chilled and served over ice for a refreshing indulgence.
Ingredients
- 2 cups whole milk
- 1/2 cup heavy cream
- 2 tbsp Dutch-processed cocoa powder
- 3 oz dark chocolate (60-70% cacao), finely chopped
- 3 tbsp superfine sugar (or to taste)
- 1 tsp pure vanilla extract
- Pinch of salt
- Ice cubes
- Optional toppings: whipped cream, chocolate shavings, caramel sauce, fresh berries
Instructions
- Chop the dark chocolate finely. In a small bowl, mix cocoa powder with a small amount of milk to form a smooth paste.
- In a medium saucepan, gently heat the milk and cream over medium-low heat until tiny bubbles appear around the edges (about 3-4 minutes). Do not boil.
- Remove from heat and whisk in the chopped chocolate until smooth. Add the cocoa paste and whisk until fully combined and glossy.
- Stir in sugar, vanilla extract, and a pinch of salt. Whisk until sugar is fully dissolved. Taste and adjust sweetness if necessary.
- Allow the mixture to cool to room temperature, then refrigerate for at least 2 hours until fully chilled.
- To serve, fill tall glasses with large ice cubes and pour the chilled chocolate mixture over the ice. Top with whipped cream and desired garnishes.
Notes
- Use whole milk for the best creamy texture – low-fat milk will result in a thinner drink
- Dutch-processed cocoa powder gives the smoothest, most mellow chocolate flavor
- The mixture must be completely chilled before serving to prevent dilution
- Store leftover mixture in refrigerator for up to 1 week – stir before using
- For extra richness, increase heavy cream ratio slightly
- Strain the mixture through fine-mesh strainer if any lumps remain
- Use larger ice cubes to minimize dilution
- Can be made sugar-free using stevia or monk fruit sweetener to taste
- Recommended Tools: HexClad Heavy Bottom Saucepan for even heating, OXO Good Grips Balloon Whisk for smooth mixing, Pyrex Glass Measuring Cups for accurate measurements, Fine Mesh Strainer by NORPRO for lump-free texture, Libbey Tall Glasses Set for perfect presentation, Immersion Blender by Braun for ultra-smooth texture
Nutrition
- Serving Size: 1 glass
- Calories: 320
- Sugar: 25g
- Sodium: 85mg
- Fat: 18g
- Saturated Fat: 11g
- Unsaturated Fat: 6g
- Trans Fat: 0g
- Carbohydrates: 32g
- Fiber: 3g
- Protein: 7g
- Cholesterol: 50mg
Keywords: iced chocolate, chocolate drink, summer beverage, homemade iced chocolate, cold chocolate recipe
Frequently Asked Questions
Absolutely! Oat milk works particularly well because of its natural creaminess. Coconut milk creates a richer, more tropical flavor profile. Almond milk works too, though the result will be lighter. You might need to adjust the sweetness slightly with non-dairy alternatives.
This usually happens when the chocolate base isn’t fully chilled before serving, or when you’re using too much ice. Make sure your mixture is thoroughly cold, use larger ice cubes, and consider chilling your glasses beforehand.
Yes! Stevia, monk fruit sweetener, or sugar-free syrups all work well. Start with less than you think you need and adjust to taste. Remember that chocolate naturally has some bitterness, so you’ll need some sweetness to balance it.
Increase the heavy cream ratio, or add a small amount of cornstarch dissolved in cold milk to the mixture while heating. Some people even add a scoop of vanilla ice cream to individual servings for ultimate richness.
I prefer chocolate with 60-70% cacao content. Brands like Valrhona, Callebaut, or even good-quality grocery store brands like Ghirardelli work beautifully. Avoid chocolate chips as they contain stabilizers that don’t melt as smoothly.
Definitely! The base can be made up to 3 days ahead and stored in the refrigerator. Set up a toppings station and let guests customize their own drinks. It’s both delicious and entertaining.
Ready to Create Your Perfect Iced Chocolate?
I hope you’re as excited as I am to make this incredible classic iced chocolate! There’s something truly magical about that first sip – the way the rich chocolate flavor unfolds, the creamy texture that coats your palate, and that perfect balance of indulgence and refreshment.
I’d love to see your creations! When you make this iced chocolate, take a photo and share it with me on social media – tag @_chocokitchen and use #NorasClassicIcedChocolate. Seeing your beautiful drinks and hearing about your favorite variations always brightens my day.
Have questions or discovered your own perfect twist? Drop a comment below! I read every single one and love connecting with fellow chocolate enthusiasts. Whether you’ve created an amazing new flavor combination, found the perfect topping, or just want to share how much you loved this recipe, I want to hear all about it.
Want more refreshing chocolate recipes? Subscribe to my newsletter for exclusive summer treats, behind-the-scenes stories from my chocolate kitchen, and seasonal recipes that’ll keep you cool and satisfied all year long. Plus, you’ll get early access to new recipes and special tips that I only share with my inner circle.
Until our next chocolate adventure, keep experimenting and enjoying those sweet moments that make life delicious!
With chocolate love and cool refreshment,
Recipe by Nora, Choco Kitchen Blog


One Comment