
No Bake White Chocolate Cheesecake
There’s a certain kind of magic in no bake desserts—and this white chocolate cheesecake holds a special place in my heart. I first made it in a bit of a panic, actually. I’d completely forgotten I promised to bring dessert to a friend’s garden party, and with the oven tied up making roast veggies, I needed a plan B… fast.
That’s when this beauty came to the rescue.
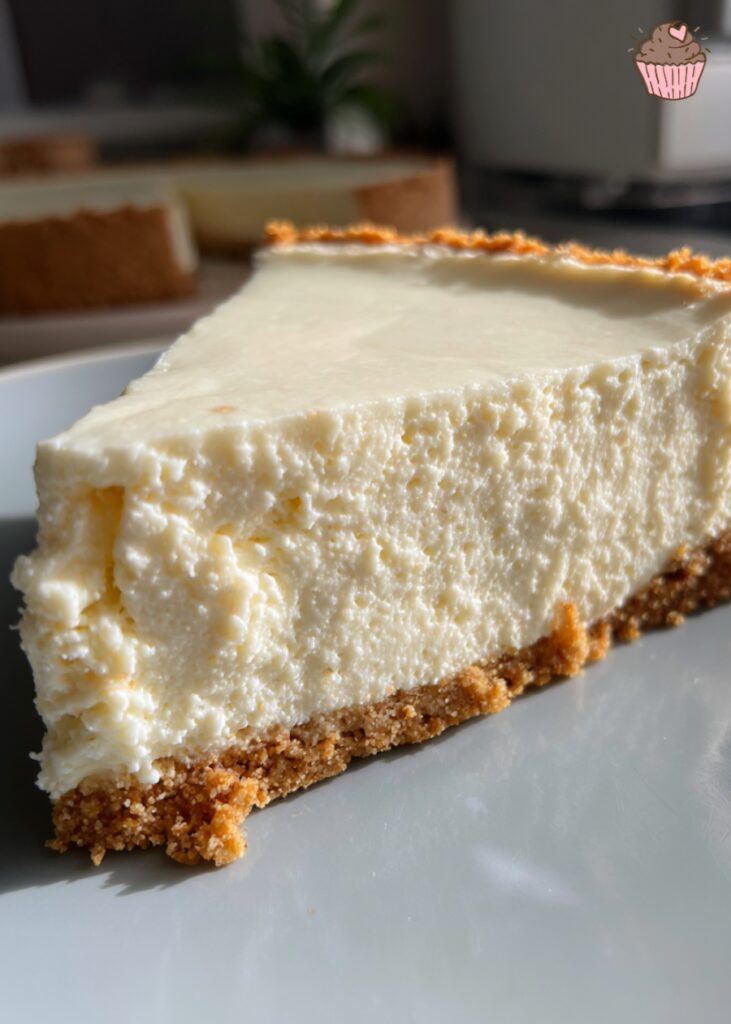
I remember melting the white chocolate, watching it swirl into the cream cheese like silk, and wondering if it would even set in time. But after just a few hours in the fridge, I sliced into it and couldn’t believe the result: a cool, creamy filling that melted on the tongue, gently sweetened with the delicate richness of white chocolate, all resting on a buttery, golden biscuit base. The vanilla scent alone was enough to make people hover nearby.
It was an instant hit—and honestly, I felt like a baking genius without ever turning on the oven.
That’s what I love most about this recipe: it’s incredibly simple, but the end result feels luxurious. If I could pull it off under pressure, I promise—you can absolutely make this too. Let me walk you through it step-by-step. You’ve got this.
Why You’ll Love This White Chocolate Cheesecake
This no bake white chocolate cheesecake is one of those magical desserts that looks and tastes like you spent hours in the kitchen—but it’s secretly effortless. No oven, no water bath, no stress. It’s the kind of recipe I turn to on hot days when I don’t want to heat up the kitchen, or when I need something impressive in a pinch.
The texture? Unbelievably smooth and velvety. The white chocolate adds a creamy sweetness that’s delicate and not too rich—perfect even for those who don’t usually love overly sugary desserts. Paired with a buttery biscuit crust and a subtle hint of vanilla, every bite just melts in your mouth.
And let’s talk presentation. This cheesecake sets beautifully in a springform pan, giving you clean, elegant slices with almost no effort. Top it with a few berries or a swirl of whipped cream, and suddenly it’s celebration-ready.
The first time I served this at a birthday brunch, everyone assumed it came from a fancy bakery. That’s when I knew this recipe was a keeper—and it’s been my go-to ever since for dinner parties, holidays, or anytime I want to wow without the work.
Ingredient Overview
What I love most about this white chocolate cheesecake—aside from how dreamy it tastes—is how simple the ingredient list is. Just a few basics come together to create something seriously luxurious. Here’s what you’ll need, and why each one matters:
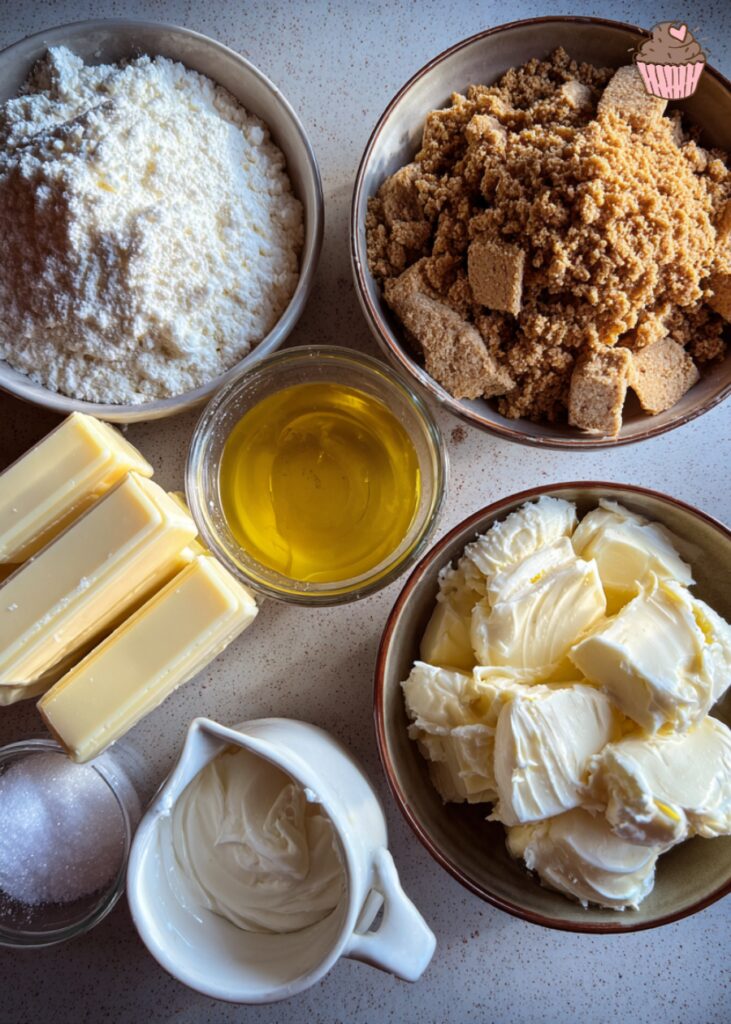
Biscuit Base
Digestive biscuits or graham crackers are my go-to for the crust. They have the perfect balance of sweetness and crunch. Crushed and mixed with melted butter, they form a golden, buttery base that contrasts beautifully with the creamy filling. You can also use shortbread cookies for a richer flavor or even Oreo crumbs if you want a chocolate twist.
White Chocolate
This is where the magic happens. Use the best white chocolate you can find—preferably bars rather than chips, which often contain stabilizers that can affect texture. A smooth, creamy white chocolate will melt down beautifully and lend a subtle sweetness to the cheesecake without overpowering it.
Cream Cheese
Full-fat cream cheese is essential here. It provides the body and tang that balances the sweetness of the white chocolate. Avoid low-fat versions—they just don’t have the same richness or stability.
Heavy Cream (Double Cream)
Whipped to soft peaks, this adds lightness and helps the cheesecake set without gelatin. I love how it softens the texture, making each bite feel like a cloud.
Vanilla Extract
Just a splash brings warmth and depth, enhancing the chocolate’s flavor. You could use vanilla bean paste for a more intense touch.
Optional Extras
Dress it up with fresh raspberries, strawberries, or blueberries on top. White chocolate curls add a lovely finishing touch. For a refreshing zing, a bit of lemon zest folded into the filling can completely transform the flavor.
Quick Tip: Make sure all ingredients are at room temperature before you start—especially the cream cheese and melted chocolate—to avoid lumps and ensure a silky-smooth filling.
Step-by-Step Instructions
Prepare the biscuit base
Start by crushing your digestive biscuits or graham crackers into fine crumbs. Mix them with melted butter until they resemble damp sand. Press the mixture firmly into the base of a springform pan or individual dessert glasses. Use the back of a spoon to compact it evenly—this helps it hold together once chilled. Pop it in the fridge while you make the filling.
Melt the white chocolate
Break the white chocolate into pieces and melt gently using a double boiler or in short 20-second bursts in the microwave, stirring between each. Be patient—white chocolate burns easily. Once melted, set it aside to cool slightly. Hot chocolate added to cream cheese can cause curdling, so let it rest for a few minutes.
Beat the cream cheese until smooth
In a large mixing bowl, beat the cream cheese with a hand mixer or whisk until smooth and fluffy. Make sure it’s at room temperature—this helps avoid lumps and ensures an even mix later. Don’t rush this step; it’s the base of your filling.
Fold in melted chocolate and vanilla
Pour the cooled white chocolate into the cream cheese and add the vanilla extract. Beat gently until everything is fully combined. You’ll notice the mixture become glossy and slightly thicker—exactly what you want.
Whip the cream and fold in
In a separate bowl, whip the heavy cream until soft peaks form. Gently fold it into the cream cheese mixture using a spatula. Do this in stages and use a light hand to keep the mixture airy and smooth—overmixing can deflate the cream and make the texture dense.
Spoon mixture over crust and smooth top
Remove the prepared base from the fridge. Spoon the filling over the crust and smooth the top with an offset spatula or the back of a spoon. For an extra-pretty finish, tap the pan gently on the counter to level it out.
Chill until set (4+ hours or overnight)
Cover the cheesecake and refrigerate for at least 4 hours, but overnight is ideal. This allows the filling to firm up while the flavors meld beautifully. Once set, you’re ready to slice and serve!
Tips for Success
To make sure your white chocolate cheesecake turns out perfectly every time, start by bringing your cream cheese to room temperature. Cold cream cheese is harder to blend and can leave you with lumps in the filling. Take it out of the fridge about 30–60 minutes before starting.
When melting white chocolate, go slow and low. It burns faster than dark or milk chocolate, and once it seizes, there’s no saving it. Let it cool slightly before mixing with the cream cheese to avoid curdling.
Chilling is crucial. While it might be tempting to rush, your cheesecake needs a minimum of 4 hours in the fridge—overnight is even better—for that silky, sliceable texture.
For the cleanest presentation, use a springform pan. It makes releasing the cheesecake much easier and gives beautiful, defined edges.
If your cheesecake turns out too soft, it likely didn’t chill long enough or the cream wasn’t whipped properly. A grainy texture usually means the chocolate was too hot when added. And if it’s too sweet, try using slightly less white chocolate next time or balancing it with a touch of citrus zest.
Variations & Flavor Ideas
This white chocolate cheesecake is wonderfully versatile, and a few simple tweaks can completely change the vibe.
For a bright, zesty contrast to the sweetness, try adding a bit of lemon zest to the filling—it cuts through the richness beautifully. Or swirl in a few spoonfuls of raspberry puree before chilling for a fruity ripple that’s as pretty as it is delicious.
Want to change up the crust? Oreos add a deep chocolatey base, while shortbread gives a buttery richness. For a gluten-free option, almond flour mixed with butter creates a lovely nutty crunch.
Craving something tropical? Stir in a handful of shredded coconut or a splash of coconut extract for a summery twist. For a festive spin around the holidays, mix in a few drops of peppermint extract and top with crushed candy canes—instant holiday magic.
And don’t forget the toppings: fresh berries, swirls of whipped cream, white chocolate curls, or even a drizzle of berry sauce make this cheesecake party-ready with almost no effort.
Serving Suggestions & Presentation
When it’s time to serve, run a sharp knife under warm water and wipe it clean between slices—this helps cut clean, beautiful portions without dragging through the creamy filling.
Presentation can be as simple or as stunning as you’d like. Top with fresh berries for a burst of color, a dusting of icing sugar for an elegant finish, or a swirl of whipped cream and white chocolate curls for a bakery-style look.
This cheesecake pairs beautifully with a cup of tea or coffee, and for a more indulgent occasion, a glass of dessert wine elevates the experience. It’s a fantastic choice for birthdays, bridal showers, and summer gatherings where you want something light, cool, and luxurious—without turning on the oven.
Storage & Freezing Tips
This no bake white chocolate cheesecake stores beautifully, making it a great make-ahead dessert. Simply refrigerate it in an airtight container for up to 3–4 days. If you’ve made individual portions in jars or cups, just pop the lids on and they’re ready to go whenever you need a treat.
For longer storage, you can freeze individual slices. Wrap each one tightly in plastic wrap, then place them in a sealed container or freezer bag. They’ll keep well for up to 1 month. When you’re ready to enjoy, thaw them overnight in the fridge—never microwave, as it can ruin the creamy texture.
If you’re taking it to a party or picnic, chill it well the night before and keep it in a cooler bag with ice packs to maintain its shape. It travels like a dream if packed carefully.
Print
No Bake White Chocolate Cheesecake
- Prep Time: 25 minutes
- Cook Time: 0 minutes
- Total Time: 4 hours 25 minutes (including chill time)
- Yield: 8–10 servings 1x
- Category: Dessert
- Method: No Bake
- Cuisine: American
- Diet: Vegetarian
Description
This no bake white chocolate cheesecake is a creamy, elegant dessert that requires no oven time. With a buttery biscuit base and a smooth, sweet white chocolate filling, it’s perfect for effortless entertaining or a special treat any time of year.
Ingredients
- 200g digestive biscuits or graham crackers
- 100g unsalted butter, melted
- 300g white chocolate, chopped
- 400g full-fat cream cheese, room temperature
- 200ml heavy cream (double cream)
- 1 tsp vanilla extract
- Optional: lemon zest, fresh berries, white chocolate curls for topping
Instructions
- Crush the biscuits into fine crumbs and mix with melted butter until combined. Press the mixture into the base of a springform pan or serving glasses. Chill while preparing the filling.
- Melt the white chocolate gently in a heatproof bowl over simmering water or in the microwave in short bursts. Let it cool slightly.
- In a large bowl, beat the cream cheese until smooth and fluffy.
- Stir the cooled white chocolate and vanilla extract into the cream cheese until fully combined.
- In a separate bowl, whip the cream until soft peaks form, then gently fold it into the white chocolate mixture.
- Spoon the mixture over the chilled crust, smoothing the top with a spatula. Tap gently to level the surface.
- Cover and refrigerate for at least 4 hours or overnight until set.
- Once set, decorate with berries, chocolate curls, or other desired toppings. Slice and serve.
Notes
- Use full-fat cream cheese for best texture and structure.
- Let the white chocolate cool slightly before adding to the cream cheese to avoid curdling.
- For clean slices, warm a knife in hot water and wipe between cuts.
- Swap the crust with Oreos, shortbread, or almond flour for variations.
- Try adding lemon zest or raspberry swirl for flavor contrast.
- Recommended tools (affiliate link): Springform Pan, Mixing Bowl Set, Electric Hand Mixer
Nutrition
- Serving Size: 1 slice
- Calories: 420
- Sugar: 22g
- Sodium: 180mg
- Fat: 32g
- Saturated Fat: 18g
- Unsaturated Fat: 11g
- Trans Fat: 0g
- Carbohydrates: 28g
- Fiber: 0.5g
- Protein: 5g
- Cholesterol: 75mg
Keywords: no bake cheesecake, white chocolate dessert, easy cheesecake, no oven dessert, summer dessert
Frequently Asked Questions
You can, but I recommend using full-fat cream cheese for the creamiest texture and best flavor. Low-fat versions tend to be less stable and can make the cheesecake a bit grainy or less rich.
White chocolate bars melt more smoothly because they contain fewer stabilizers than chips. If you use chips, melt them slowly and watch carefully to avoid burning or graininess.
The cheesecake needs at least 4 hours in the fridge to firm up properly, but overnight chilling is best for clean slices and a silky texture.
You can try using dairy-free cream cheese and coconut cream as substitutes, but keep in mind the texture and flavor might be slightly different. Be sure to choose a high-quality dairy-free chocolate as well.
It’s usually because it hasn’t chilled long enough, or the cream wasn’t whipped to soft peaks before folding in. Also, if the melted chocolate was too warm when added, it can affect firmness. Make sure to follow chilling times and gentle folding techniques.
Conclusion
This no bake white chocolate cheesecake is proof you don’t need an oven to wow a crowd. It’s simple, elegant, and delicious—perfect for any occasion when you want a show-stopping dessert without the fuss.
I can’t wait for you to try it! Please share your baking stories, tips, or questions in the comments below. If you make this cheesecake, don’t forget to snap a photo and tag me on social media—I love seeing your creations.
And if you want more easy, irresistible recipes delivered right to your inbox, be sure to sign up for our newsletter. Happy no-bake baking!
Recipe by Nora, Choco Kitchen Blog


