
Pani Puri (Gol Gappa): 7 Irresistible DIY Steps
Oh my goodness, let me tell you about Pani Puri! This little gem of Indian street food is an explosion of flavor in every bite. I still remember the first time I had it at a bustling market in Mumbai—my taste buds were dancing! It’s all about those crispy puris that are like tiny, crunchy vessels just waiting to be filled with a tantalizing mix of spicy water and savory goodness. Trust me, you can’t just have one! The combination of flavors—from the tangy tamarind to the fresh mint—creates a refreshing experience that’s simply irresistible. Making Pani Puri at home is not only a fun adventure, but it also brings the joy of street food right into your kitchen!
Ingredients for Pani Puri
- 1 cup Semolina (sooji)
- 2 tablespoons All-purpose flour
- Water (as needed to make the dough)
- 1/2 cup Chickpeas (boiled)
- 1 medium Potato (boiled and mashed)
- 2 tablespoons Tamarind pulp
- 1 teaspoon Chaat masala
- 1 Green chili (finely chopped)
- 2 tablespoons Coriander leaves (chopped)
- Salt (to taste)
- 4 cups Cold water
- 1 teaspoon Black salt
- 1/4 cup Mint leaves
- 1 tablespoon Lemon juice
How to Prepare Pani Puri
Alright, let’s dive into the fun part—making your very own Pani Puri! Don’t worry, I’ll walk you through each step, and soon enough, you’ll be a Pani Puri pro. It’s all about the crispy puris, flavorful filling, and that zingy spicy water. Ready? Let’s go!
Making the Puri
First things first, let’s create those amazing puris! In a mixing bowl, combine the semolina and all-purpose flour. Gradually add water, just enough to form a smooth and pliable dough. You want it to be soft but not sticky—think play dough consistency! Cover the dough with a damp cloth and let it rest for about 30 minutes. This step is crucial for the puris to puff up perfectly when fried.
Now comes the exciting part! Heat oil in a deep pan over medium heat. You want it hot enough to fry but not so hot that the puris burn. A good test is to drop a small piece of dough into the oil; if it sizzles and rises to the top, you’re ready! Roll out small circles from the dough, about the size of a coin. Fry them in batches for 30 seconds to a minute until they turn golden brown and puff up. Remove them with a slotted spoon and drain on paper towels. Ah, that crunch is going to be heavenly!
Preparing the Filling
Now, let’s whip up that flavorful filling! In a large bowl, combine the boiled chickpeas and mashed potato. Add the chaat masala, finely chopped green chili, chopped coriander leaves, and salt to taste. Mix everything together until well combined. You want it to be flavorful and slightly spicy, so feel free to adjust the spices to your liking. This filling is what makes every bite of Pani Puri so satisfying!
Making the Spicy Water
Next up is the star of the show—the spicy water! In a blender, combine the mint leaves, tamarind pulp, black salt, and lemon juice with the cold water. Blend until you have a smooth mixture. Taste it! You’re looking for a balance of tangy, spicy, and refreshing. If it’s too thick, add a bit more water until you reach your desired consistency. It should be thin enough to sip but packed with flavor!
Assembling Pani Puri
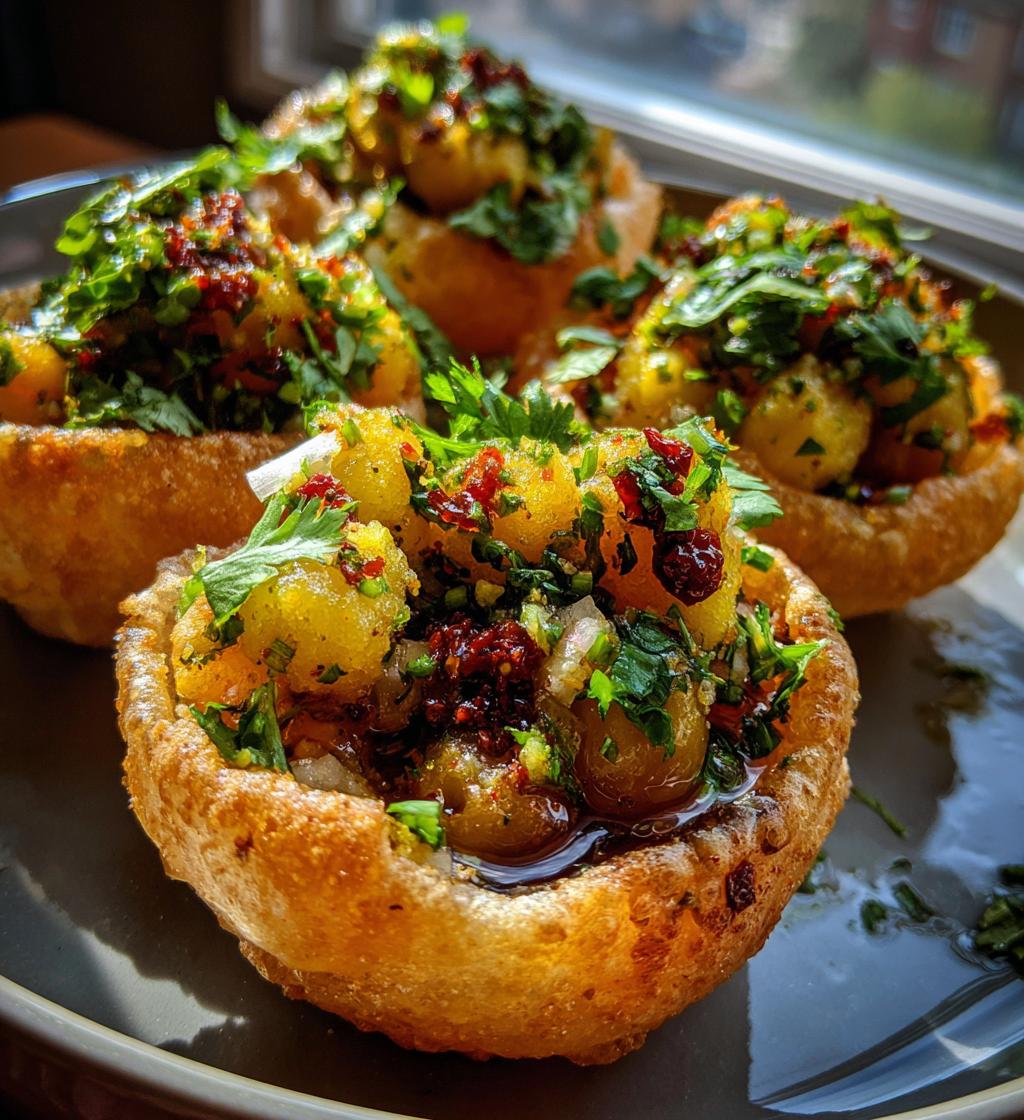
Finally, it’s time to put it all together! Take each crispy puri and gently make a small hole in the top. Don’t worry, this is where the magic happens! Fill each puri with a spoonful of the chickpea and potato filling, then dip it into that zesty spicy water. You can also serve the spicy water in a small bowl for dipping. Trust me, you’ll want to eat these immediately for the best experience! The crunch, the spice, the flavors—it’s pure bliss!
Why You’ll Love This Recipe
- Super quick to prepare—perfect for a last-minute snack!
- Incredible flavor that rivals your favorite street vendor.
- Customizable fillings and spice levels, so you can make it just how you like it.
- Assembling Pani Puri is a fun and interactive experience—great for gatherings!
- Fresh, homemade puris are unbeatable; that crunch is divine!
- Healthy ingredients mean you can enjoy this treat without guilt.
- Perfect for impressing friends and family with your culinary skills.
- It’s a delightful way to bring a taste of India right into your home.
Tips for Success
Alright, friends, let’s make sure your Pani Puri turns out absolutely perfect every single time! Here are my top tips that I swear by:
- Oil Temperature: Getting the oil temperature just right is crucial. If it’s too cool, your puris will absorb oil and become soggy. Too hot, and they’ll burn before puffing up. Aim for around 350°F (175°C) for that crispy perfection!
- Resting Time: Don’t skip the resting time for the dough! This helps the gluten relax, leading to beautifully puffed puris. Trust me, it’s worth the wait!
- Adjusting Spice Levels: Taste as you go! Start with a small amount of spices in your filling and spicy water, then add more to suit your palate. Everyone has different spice tolerance, so customize it to your liking!
- Fry in Batches: Fry your puris in small batches to avoid overcrowding the pan. This ensures they cook evenly and puff up nicely. Plus, it’s just more fun watching them dance in the oil!
- Serve Immediately: Pani Puri is best served fresh! Assemble them right before serving to keep that delightful crunch intact. If you have a crowd, set up a Pani Puri station so everyone can fill and dip at their pace.
- Experiment with Fillings: Don’t be afraid to get creative! You can use different fillings like spiced lentils, sprouts, or even fruits for a unique twist. The world is your oyster—or should I say puri?
With these tips, you’ll be well on your way to mastering Pani Puri! Enjoy the process and have fun with it—your family and friends will be so impressed!
Nutritional Information
Now, let’s talk about the numbers! Each serving of Pani Puri (which is about 2 pieces) packs a punch while still being a delightful snack. Here’s the estimated nutritional breakdown:
- Calories: 150
- Fat: 7g
- Saturated Fat: 1g
- Unsaturated Fat: 6g
- Trans Fat: 0g
- Cholesterol: 0mg
- Sodium: 200mg
- Carbohydrates: 20g
- Fiber: 3g
- Protein: 3g
- Sugar: 2g
Keep in mind, these values are estimates and can vary based on how you prepare your Pani Puri. But hey, with fresh ingredients and all that flavor, you can enjoy this treat guilt-free! Just remember to savor every crunchy, spicy bite!
FAQ Section
Got questions about Pani Puri? Don’t worry, I’ve got you covered! Here are some of the most common queries I hear, along with my trusty answers:
Can I make the puris ahead of time?
While it’s best to fry the puris fresh for that perfect crunch, you can prepare the dough in advance and store it in the fridge. Just remember to let it come to room temperature before rolling and frying!
What’s the best way to store leftover Pani Puri?
Leftover puris can be stored in an airtight container at room temperature for a day or two, but they’ll lose their crispness. For the filling and spicy water, keep them in the fridge in separate containers. Just assemble fresh puris when you’re ready to enjoy them again!
How can I adjust the spice level?
If you like it spicy, add more green chilies to your filling and some extra black salt to the spicy water. For a milder version, use less chili and balance it with more mint in the water. Always taste as you go to find your perfect balance!
Can I use different fillings?
Absolutely! You can get creative with fillings—try spiced lentils, boiled sprouts, or even a mix of fruits for a sweet twist. The sky’s the limit, so feel free to experiment with what you love!
What if my puris don’t puff up?
If your puris aren’t puffing, it might be due to the oil being too cool. Make sure it’s hot enough before frying. Also, don’t roll the dough too thin; a thicker puri will puff better. If all else fails, just enjoy them as crispy snacks—they’ll still be delicious!
Can I make the spicy water ahead of time?
Yes! You can prepare the spicy water ahead of time and store it in the fridge. Just give it a good stir before serving, as the ingredients might settle. If you find it too thick after chilling, add a splash of cold water to loosen it up.
Is Pani Puri vegan?
Yes, Pani Puri is naturally vegan as it doesn’t contain any animal products. Just double-check your spice blends and chutneys to ensure they are also vegan-friendly!
Hopefully, these answers help you feel ready to take on Pani Puri with confidence! If you have more questions, just ask—I’m here to help you on this delicious journey!
Storage & Reheating Instructions
So, you’ve made a batch of Pani Puri and have some leftovers? No worries, I’ve got you covered! Storing them properly is key to keeping that delightful crunch and flavor intact.
First, let’s talk about the puris. It’s best to store them in an airtight container at room temperature. They’ll stay crispy for about a day or two. Just remember, the longer they sit, the softer they might get, so enjoy them while they’re fresh!
Now, for the filling and spicy water, you’ll want to keep those in separate containers in the fridge. The filling should hold up nicely for a couple of days, and the spicy water can last about the same time. Just make sure to seal them tightly!
When you’re ready to enjoy your Pani Puri again, you can refresh the puris by popping them back into hot oil for a few seconds. This will help them regain that glorious crunch! As for the filling and water, just give them a good stir before serving, and if the water has thickened, add a splash of cold water to loosen it up.
Trust me, with these simple storage and reheating tips, you’ll be able to relish your homemade Pani Puri again and again! Enjoy every bite!
Print
Pani Puri (Gol Gappa): 7 Irresistible DIY Steps
- Prep Time: 30 minutes
- Cook Time: 15 minutes
- Total Time: 45 minutes
- Yield: 4 servings
- Category: Snack
- Method: Frying
- Cuisine: Indian
- Diet: Vegetarian
Description
Pani Puri is a popular Indian street food consisting of crispy puris filled with spicy water, tamarind chutney, and various fillings.
Ingredients
- Semolina (sooji) – 1 cup
- All-purpose flour – 2 tablespoons
- Water – as needed
- Chickpeas (boiled) – 1/2 cup
- Potato (boiled and mashed) – 1 medium
- Tamarind pulp – 2 tablespoons
- Chaat masala – 1 teaspoon
- Green chilies (finely chopped) – 1
- Coriander leaves (chopped) – 2 tablespoons
- Salt – to taste
- Cold water – 4 cups
- Black salt – 1 teaspoon
- Mint leaves – 1/4 cup
- Lemon juice – 1 tablespoon
Instructions
- Mix semolina and all-purpose flour in a bowl.
- Add water gradually to make a smooth dough.
- Cover and let it rest for 30 minutes.
- Roll out small circles and deep fry until crispy.
- Prepare the filling by mixing boiled chickpeas, mashed potato, chaat masala, green chilies, coriander leaves, and salt.
- Blend mint leaves, tamarind pulp, black salt, and lemon juice with cold water to make the spicy water.
- Make a small hole in each puri, fill it with the filling, and dip in the spicy water before serving.
Notes
- Ensure the oil is hot for crispy puris.
- Adjust spice levels to your preference.
- Serve immediately for best taste.
Nutrition
- Serving Size: 2 pieces
- Calories: 150
- Sugar: 2g
- Sodium: 200mg
- Fat: 7g
- Saturated Fat: 1g
- Unsaturated Fat: 6g
- Trans Fat: 0g
- Carbohydrates: 20g
- Fiber: 3g
- Protein: 3g
- Cholesterol: 0mg
Keywords: Pani Puri, Gol Gappa, Indian street food, snacks


