
Simple Chocolate Sheet Cake
There’s something irresistibly comforting about chocolate sheet cake. It’s not just the rich, velvety texture or the deep cocoa flavor that melts into every bite—it’s the memories it stirs up. For me, sheet cake was always a “celebration cake.” You know the one—sprawled out on a big tray at birthday parties, topped with glossy icing, maybe even sprinkles if we were feeling fancy. It wasn’t fussy or fragile like layer cakes. It was generous. Unpretentious. The kind of cake you could slice into squares and eat straight from a napkin.
I remember helping my mom in the kitchen, standing on a stool too small for my wobbly feet, stirring cocoa into warm melted butter. The smell was pure magic—like a warm hug laced with anticipation. We’d pour the glossy batter into a baking pan, and I’d sneak tastes when she turned her back. When the cake came out of the oven, we’d frost it while it was still warm so the icing melted just slightly into the top, creating that shiny, crackled top I still dream about.
This chocolate sheet cake is my grown-up homage to that memory. It’s unfussy but deeply satisfying, with a texture that’s fluffy yet rich, and a flavor that speaks for itself—dark chocolate kissed with vanilla and a hint of coffee to deepen the cocoa. Whether you’re baking for a crowd or just want something sweet to slice and snack on all week, this cake is pure joy in a pan.
And trust me—you’ll want more than one slice.
Key Ingredients Breakdown: What Makes This Cake So Irresistible
Let’s dive into the magic behind this chocolate sheet cake by looking at its key players. Each ingredient isn’t just there to fill space—they have a specific job that brings out the cake’s signature texture and flavor.
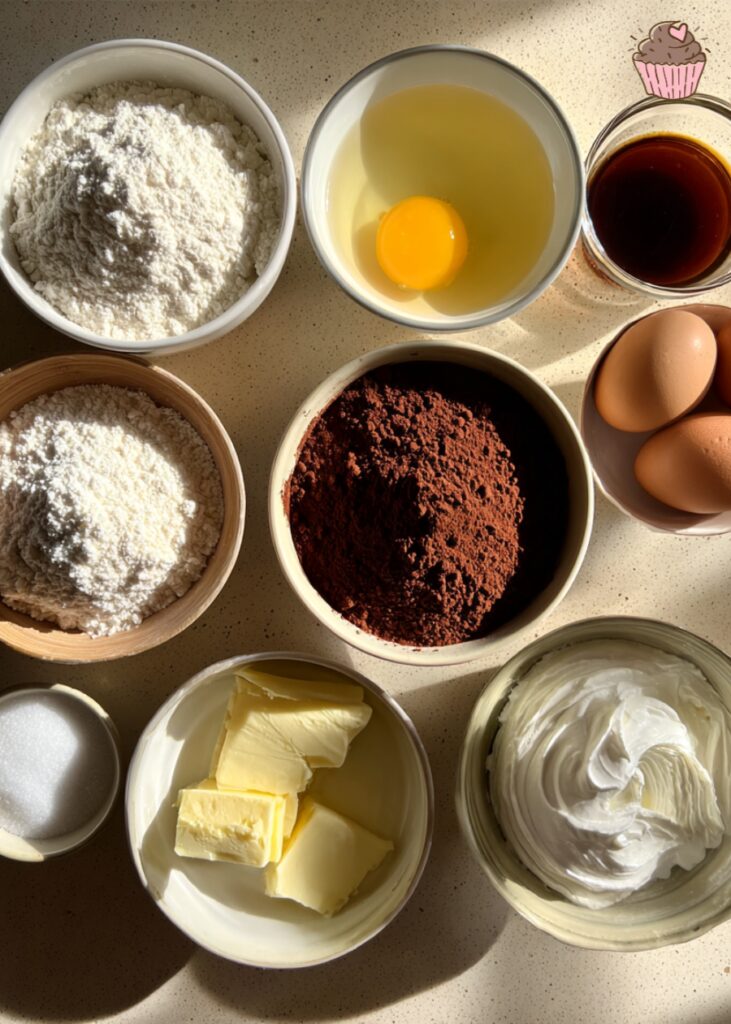
1. Butter:
Butter is where much of the cake’s richness comes from. It adds moisture and a silky crumb that makes every bite melt on your tongue. Unlike oil-based cakes, butter gives a depth of flavor that feels indulgent but never greasy. If you’re in a pinch, you can substitute with an equal amount of vegetable oil, but you’ll miss out on that classic buttery note that really rounds out the cocoa.
2. Unsweetened Cocoa Powder:
The star of the show, cocoa powder brings the chocolate intensity. Using a good-quality unsweetened cocoa ensures a deep, robust flavor without any added sugar. Natural cocoa powder works beautifully here, but if you prefer a milder taste, Dutch-processed cocoa can be swapped in—it’s less acidic and gives a smoother chocolate flavor. Just keep in mind it can affect the cake’s rise slightly because of its alkalinity.
3. Buttermilk:
Buttermilk isn’t just a tangy addition; it’s a game-changer for texture. The acidity in buttermilk reacts with the baking soda, creating tiny bubbles that make the cake light and fluffy while keeping it moist. If you don’t have buttermilk on hand, you can make a quick substitute by adding one tablespoon of lemon juice or white vinegar to a cup of regular milk—let it sit for 5 minutes, and voilà, you’re good to go!
4. Baking Soda:
This leavening agent works with the acidity of the buttermilk to give the cake lift. Without it, you’d end up with a dense, heavy crumb. It’s important not to skip or reduce it, as it’s key to that perfect balance of tender and airy.
5. Granulated Sugar:
Sugar sweetens, of course, but it also helps tenderize the crumb and keep moisture locked in. This recipe balances sweetness with the bitterness of cocoa perfectly—no need to drown the cake in frosting.
Together, these ingredients create a symphony of flavor and texture that makes this chocolate sheet cake so beloved. Each one plays a crucial role, but they also work beautifully together—like a well-rehearsed orchestra delivering a flawless performance.
How to Make Chocolate Sheet Cake: Step-by-Step
Baking this chocolate sheet cake is easier than you might think, but a few simple techniques will help you nail the perfect texture and flavor every time. Let’s walk through it together.
1. Preheat and Prepare Your Pan
Start by preheating your oven to 350°F (175°C). Grease your 9×13-inch sheet pan thoroughly with butter or nonstick spray, then lightly dust it with flour or cocoa powder to keep the cake from sticking. This little step helps the cake release cleanly, making your slices look sharp and beautiful.
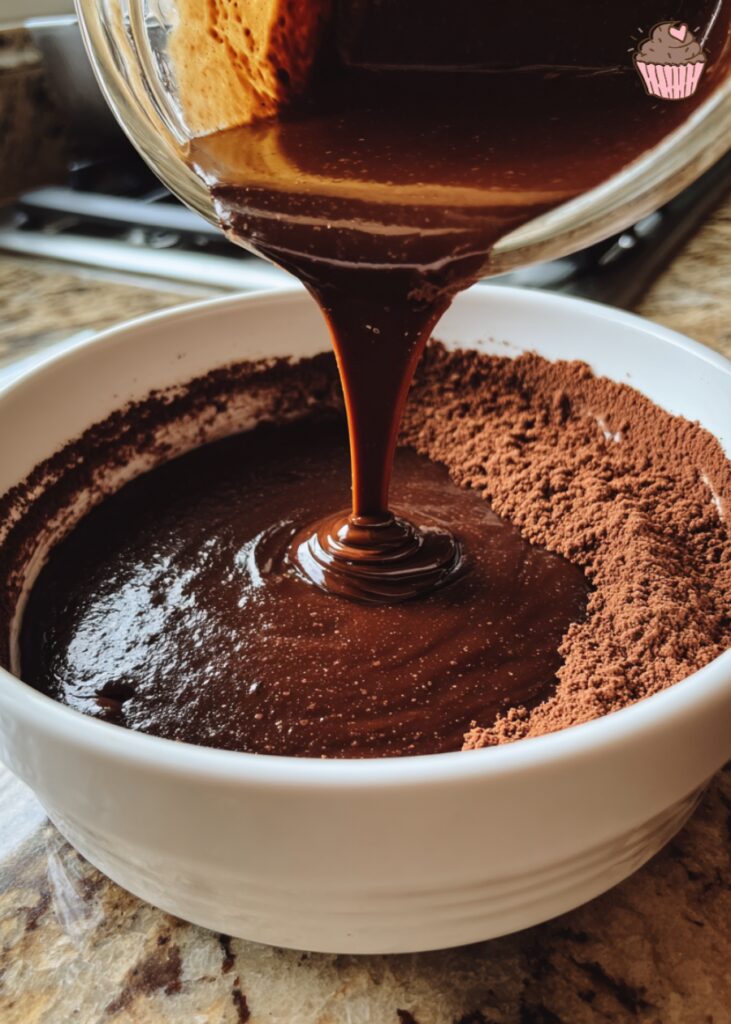
2. Melt Butter and Combine with Cocoa
In a medium saucepan over low heat, melt your butter completely. Once melted, whisk in the unsweetened cocoa powder until smooth and glossy. This warm, chocolatey mixture smells heavenly and forms the base of your batter, giving it that deep, rich flavor. Remove from heat and let it cool slightly—too hot, and it’ll cook your eggs when added.
3. Mix Wet Ingredients
In a large mixing bowl, whisk together the granulated sugar and eggs until combined. Then stir in the buttermilk and vanilla extract. The buttermilk adds moisture and a slight tang, balancing the sweetness perfectly.
4. Combine Dry Ingredients
In a separate bowl, sift together the flour, baking soda, and salt. Sifting helps prevent lumps and ensures the leavening is evenly distributed, which is key for an even rise.
5. Bring It All Together
Gradually add the cocoa-butter mixture to your wet ingredients, stirring gently but thoroughly. Then alternate adding the dry ingredients and the buttermilk mixture, mixing just until combined. The batter should be smooth, glossy, and pourable—thicker than pancake batter but lighter than brownie batter.
6. Pour and Smooth
Pour the batter into your prepared sheet pan. Use a spatula or the back of a spoon to spread it evenly to the edges. The batter’s thickness will help it level out naturally, but a little smoothing ensures a perfectly even cake.
7. Bake Until Just Set
Place your pan in the oven and bake for about 30–35 minutes. The cake should spring back gently when touched, and a toothpick inserted into the center will come out with just a few moist crumbs attached—not wet batter. The edges will start to pull slightly away from the pan, releasing that wonderful, slightly caramelized aroma.
8. Cool Before Frosting
Once baked, remove the cake from the oven and place it on a cooling rack. Let it cool completely to room temperature before frosting. This prevents the frosting from melting and sliding off, while allowing the cake to set perfectly.
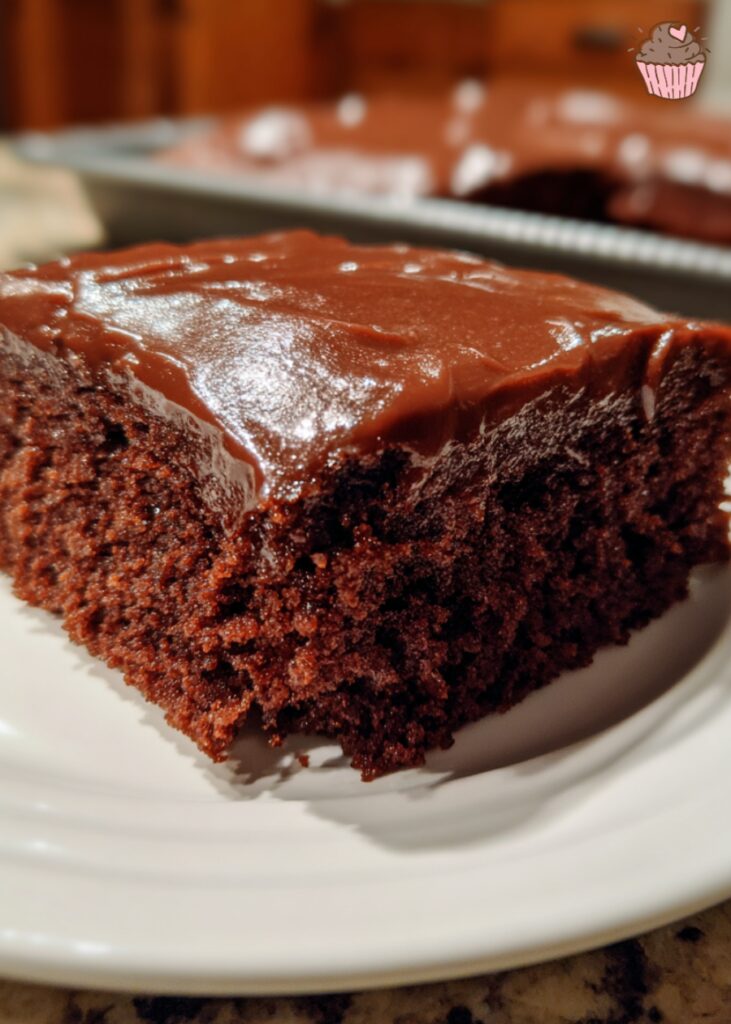
9. Frost and Indulge
Spread your favorite chocolate frosting generously over the top. For a classic touch, try a rich, fudgy chocolate glaze that seeps into the cake’s surface. Use an offset spatula for smooth, even coverage, and don’t be shy with the frosting—it’s the best part!
By paying attention to these simple cues—texture, aroma, and timing—you’ll bake a chocolate sheet cake that’s tender, moist, and packed with deep chocolate flavor every single time. Baking isn’t just about following a recipe—it’s about tuning in to your senses, and this cake makes that experience deliciously easy.
Pro Tips for Perfect Results: Nail That Chocolate Sheet Cake Every Time
Baking a chocolate sheet cake might seem straightforward, but a few insider tips can elevate your game from good to truly unforgettable. Here’s what I’ve learned from countless bakes and a fair share of “oops” moments:
1. Measure Ingredients Precisely:
Baking is a science, so weighing your flour or using the spoon-and-level method can make a big difference. Too much flour leads to a dry, dense cake, while too little causes it to collapse.
2. Don’t Overmix the Batter:
Once you combine the wet and dry ingredients, mix just until everything comes together. Overmixing develops gluten, which can make the cake tough rather than tender and fluffy.
3. Use Fresh Cocoa Powder:
Cocoa loses its punch over time. Fresh, high-quality cocoa ensures that rich, deep chocolate flavor. If your cocoa is old or clumpy, it might taste flat or bitter.
4. Let Butter-Cocoa Mixture Cool Slightly:
Add the melted butter and cocoa mixture to the wet ingredients when it’s warm but not hot. If it’s too hot, you risk scrambling the eggs and ending up with a lumpy batter.
5. Bake Until Just Done:
Oven temperatures vary, so start checking your cake a few minutes before the timer. A toothpick with moist crumbs (not wet batter) is the perfect doneness indicator. Overbaking dries out the cake quickly.
6. Cool Completely Before Frosting:
Patience here pays off! Frosting a warm cake will cause it to melt and slide off, leaving you with a mess instead of a beautiful finish.
7. Experiment with Add-Ins:
Want to take this classic cake up a notch? Toss in chopped walnuts, swirl in peanut butter, or add a teaspoon of espresso powder to the batter to deepen the chocolate notes.
By keeping these tips in mind, you’ll avoid common pitfalls and end up with a chocolate sheet cake that’s moist, tender, and bursting with flavor—exactly what every good chocolate cake should be.
How to Store, Freeze, and Make Ahead
Storing your chocolate sheet cake properly is key to keeping it moist and delicious for days. Once frosted, cover the cake tightly with plastic wrap or place it in an airtight container. Stored at room temperature, it will stay fresh for about 2–3 days—perfect for quick snacking. If you want it to last longer, refrigerate it for up to a week, but bring it to room temperature before serving to restore that soft, tender texture.
Freezing is a fantastic option if you want to make this cake ahead of time. Wrap individual slices or the whole cake tightly in plastic wrap and then foil to prevent freezer burn. It keeps well for up to 3 months. To thaw, transfer the cake to the fridge overnight, then let it sit at room temperature for about an hour before enjoying.
When reheating, a few seconds in the microwave can bring back that just-baked warmth, especially if you like your cake slightly gooey. Just be careful not to overdo it—otherwise, it can dry out quickly. With these tips, your chocolate sheet cake will be ready whenever those sweet cravings strike!
Print
Simple Chocolate Sheet Cake
- Prep Time: PT15M
- Cook Time: PT35M
- Total Time: PT50M
- Yield: 12–16 servings 1x
- Category: Dessert
- Method: Baking
- Cuisine: American
- Diet: Vegetarian
Description
This rich and tender chocolate sheet cake is a nostalgic favorite made with semi-sweet chocolate chips and vegetable oil for a perfectly moist crumb. It’s simple, satisfying, and ideal for any occasion—from casual get-togethers to birthdays and beyond.
Ingredients
- 2 cups all-purpose flour
- 1 ½ cups granulated sugar
- ¾ cup unsweetened cocoa powder
- 1 ½ tsp baking soda
- ½ tsp baking powder
- ½ tsp salt
- 2 large eggs
- 1 cup buttermilk
- 1 cup warm water
- ½ cup vegetable oil
- 2 tsp vanilla extract
- 1 cup semi-sweet chocolate chips
Instructions
- Preheat oven to 350°F (175°C). Grease and flour a 9×13-inch baking pan.
- In a large bowl, whisk together flour, sugar, cocoa powder, baking soda, baking powder, and salt.
- In another bowl, whisk eggs, buttermilk, warm water, oil, and vanilla until combined.
- Gradually add wet ingredients to dry ingredients and mix until smooth. Fold in chocolate chips.
- Pour batter into prepared pan and smooth the top.
- Bake for 30–35 minutes or until a toothpick inserted in the center comes out with moist crumbs.
- Cool completely in pan on a wire rack before frosting or serving.
Notes
- For extra richness, add a teaspoon of instant espresso powder.
- Use Dutch-process cocoa for a milder chocolate flavor.
- Store at room temperature for up to 3 days or refrigerate for a longer shelf life.
- This cake freezes beautifully—wrap tightly and freeze for up to 3 months.
- Recommended Tools (affiliate links):
- 9×13 Sheet Pan
- Offset Spatula
- Cooling Rack
- Mixing Bowl Set
Nutrition
- Serving Size: 1 slice
- Calories: 320
- Sugar: 28g
- Sodium: 210mg
- Fat: 16g
- Saturated Fat: 5g
- Unsaturated Fat: 9g
- Trans Fat: 0g
- Carbohydrates: 42g
- Fiber: 3g
- Protein: 4g
- Cholesterol: 35mg
Keywords: chocolate sheet cake, easy chocolate cake, moist chocolate cake, potluck dessert, party cake
Frequently Asked Questions
This recipe typically serves about 12 to 16 people, depending on how big you cut the slices. It’s perfect for gatherings or meal prepping treats for the week.
Absolutely! Substitute the all-purpose flour with a 1-to-1 gluten-free baking blend. Just be sure the blend contains xanthan gum for structure, and watch the baking time closely, as it might vary slightly.
You can, but I recommend making a quick buttermilk substitute by adding one tablespoon of lemon juice or vinegar to one cup of milk. Let it sit for five minutes before using. This acidity helps the cake stay moist and tender.
Yes, you can! Just wrap the frosted cake tightly in plastic wrap and then foil. Thaw it in the fridge overnight and bring it to room temperature before serving for the best texture.
A quick 10–15 seconds in the microwave will warm up a slice perfectly, making it soft and a little gooey without drying it out. Enjoy it with a scoop of vanilla ice cream for an extra treat!
Final Thoughts: Your Next Favorite Chocolate Cake Awaits
Baking this chocolate sheet cake is more than just following a recipe—it’s about creating moments of joy, nostalgia, and pure chocolatey bliss. Whether you’re making it for a special occasion or just because, I promise this cake will become a beloved staple in your kitchen.
Don’t worry if you’re new to baking; this recipe is forgiving, approachable, and designed to deliver amazing results every time. So, grab your mixing bowl and give it a go—you might just surprise yourself!
Once you’ve baked your cake, I’d love to hear how it turned out. Share your experience, your favorite variations, or even those funny little mishaps that make baking so memorable. Happy baking!
Recipe by Nora, Choco Kitchen Blog


